MavicMapper – free offline DJI waypoint mission planner · Mavic 3 Pro · Mavic 4 Pro · Mini 5 Pro · Mini 4 Pro · Lito X1Plan the flight.Own the data.
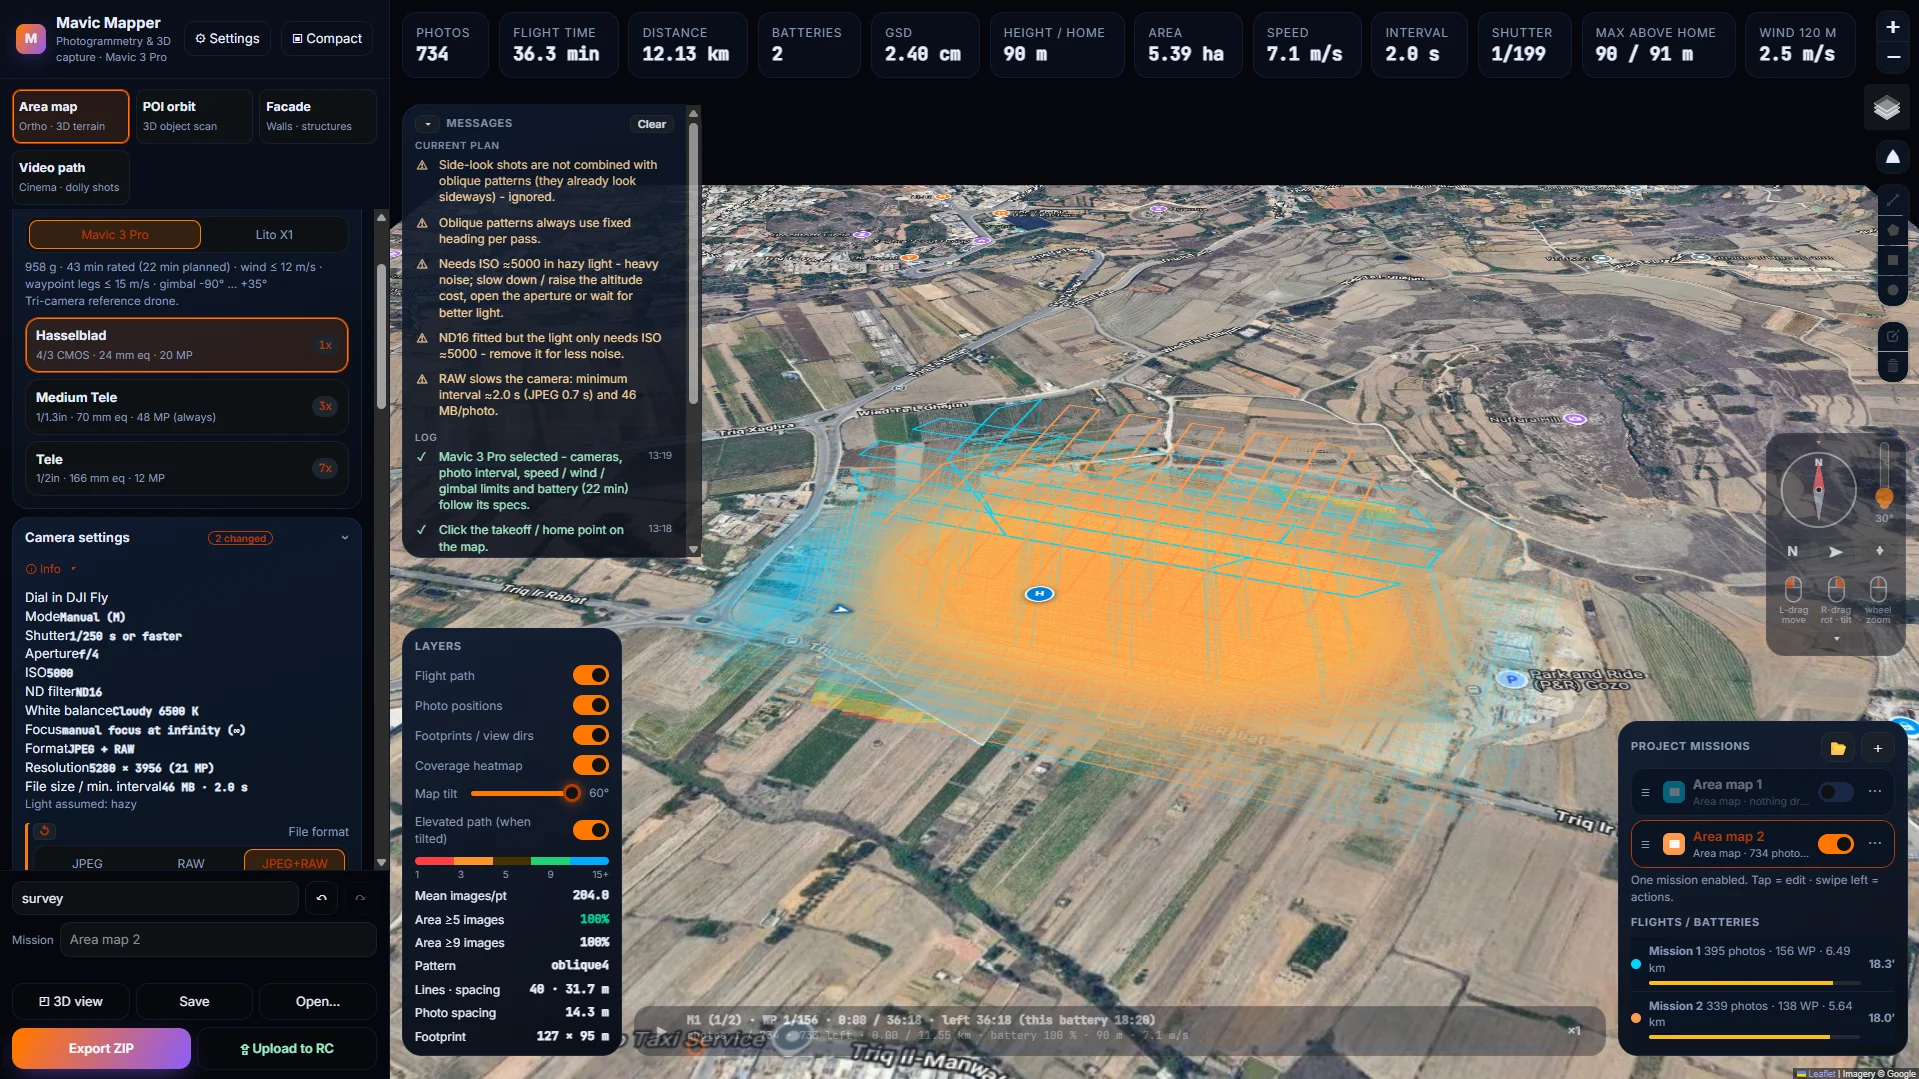
The mission planner DJI Fly never shipped. Now for five drones: Mavic 3 Pro, Mavic 4 Pro, Mini 5 Pro, Mini 4 Pro and Lito X1 – pick yours above and every preview and demo on this page switches to its sensor, lenses, limits and battery. Map an area for photogrammetry, orbit a tower for a 3D model, scan a façade or sketch a cinematic camera move – and get a flight-ready waypoint KMZ. Weather, camera settings, mission properties and flight type are all weighed at once and drawn straight into the flight-path preview – with full control over every detail – before the drone leaves the ground. Then upload it to your DJI RC Pro over USB in one click. Play with the planner right on this page.
🔗 This page is fully interactive & responsive. Every slider, chart and 3D view is live – and the sections talk to each other and to the built-in Mission Lab.
.exe blocked by your browser or Windows? Get the .zip version – unpack it and run the .exe.
⚖️ Planning aid only – the remote pilot stays solely responsible for every flight. Legal & safety disclaimers
Switch the drone – the whole plan follows
MavicMapper plans native DJI Fly waypoint missions for the Mavic 3 Pro, Mavic 4 Pro, Mini 5 Pro, Mini 4 Pro and Lito X1. Enable the drones you fly once, pick one per mission – its sensor, lenses, photo interval, speed, wind, gimbal and battery limits are then used in every calculation and every preview. Try it below: every demo on this page follows your choice.
Open App settings (gear in the left rail) and switch on the aircraft you fly in the group Drones. Only the Mavic 3 Pro is on by default.
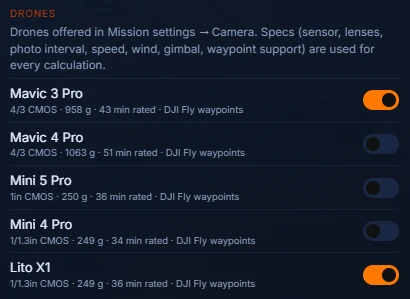
Your enabled drones appear as a selector in the Camera section. Try it here – the whole page follows.
Faster capture, smarter limits
Continuous fly-through capture with an ⚡ As fast as possible optimiser, one-tap FIX for every limit, gimbal speed limits for smoother video, two new mission types – Panorama and Hi-res footprint – plus better drawing, flight order and waypoint execution. Every demo below runs the planner’s own formulas for the drone you selected.
Why I built this
Hello, and welcome.
I wanted something that simply didn't exist: an offline, local and fully customizable mission planner that can do more than any other solution on the market. A tool I can trust in a field with no signal, where every site and every photo stays on my own machine – and one that is deep enough for the odd, demanding jobs: a quarry, a façade, a monument, a cinematic dolly shot.
There was also a very simple, very honest reason: I don't have money to spend on subscriptions or software packages – and I don't believe a good idea, or a good flight, should depend on a monthly fee. So I rolled up my sleeves and built it myself: smart features, state-of-the-art interaction and genuine ease of use, while squeezing every bit of technical ability out of the hardware and software we already hold in our hands – the Mavic 3 Pro, the remote controller and the computer on the desk.
That is the bigger reason. A sunrise over a quarry, a church tower in perfect evening light, a 3D model of a place that will look different tomorrow, a flight that makes someone catch their breath – these moments are worth capturing, and the knowledge of how to capture them is worth sharing. If this tool helps you create one of them, or teaches you something new about photogrammetry, light or flying, then it has done its job.
So now it is yours: absolutely free of charge, without restrictions – no strings, no trial, no catch. Use it, learn from it, pass it on to a friend, a club, a classroom. And please fly safe, fly kind, and respect the people and places beneath your drone.
With warmth,
Jeannot KuenzelJK4U · www.jk4u.net
Knowledge is for sharing
Free for everyone – so more people can learn, create and pass on what they discover.
Offline & local
One native program. Double-click, the browser opens, you plan. Only optional lookups (maps, elevation, OSM, weather) touch the internet.
Fully customizable
Every limit, slider range, preset and default is yours to change – even the accent colour.
More than the rest
Grid, crosshatch, oblique, orbit, façade, cinematic video, chaining, terrain following, wind, gap analysis, USB upload…
Smart, simple, state of the art
Live 3D feedback, one-click FIXes and presets – powerful for experts, friendly for first flights.
Free, no strings
No licence keys, no trial timer, no feature walls. Download it, use it, share it.
From download to first flight in 5 steps
No installer, no account, no setup wizard. Click through the steps – they play automatically.
What would you like to do today?
Answer three quick questions – pick at least one option in each – and get a fitting mission built from the app's own presets, with weather and conditions already considered. Then open it in the Mission Lab and customize every detail.
Know your cockpit
Tap the pulsing numbers on a real MavicMapper screen – or pick an area from the list – and it is outlined and explained.
Every setting becomes flight path
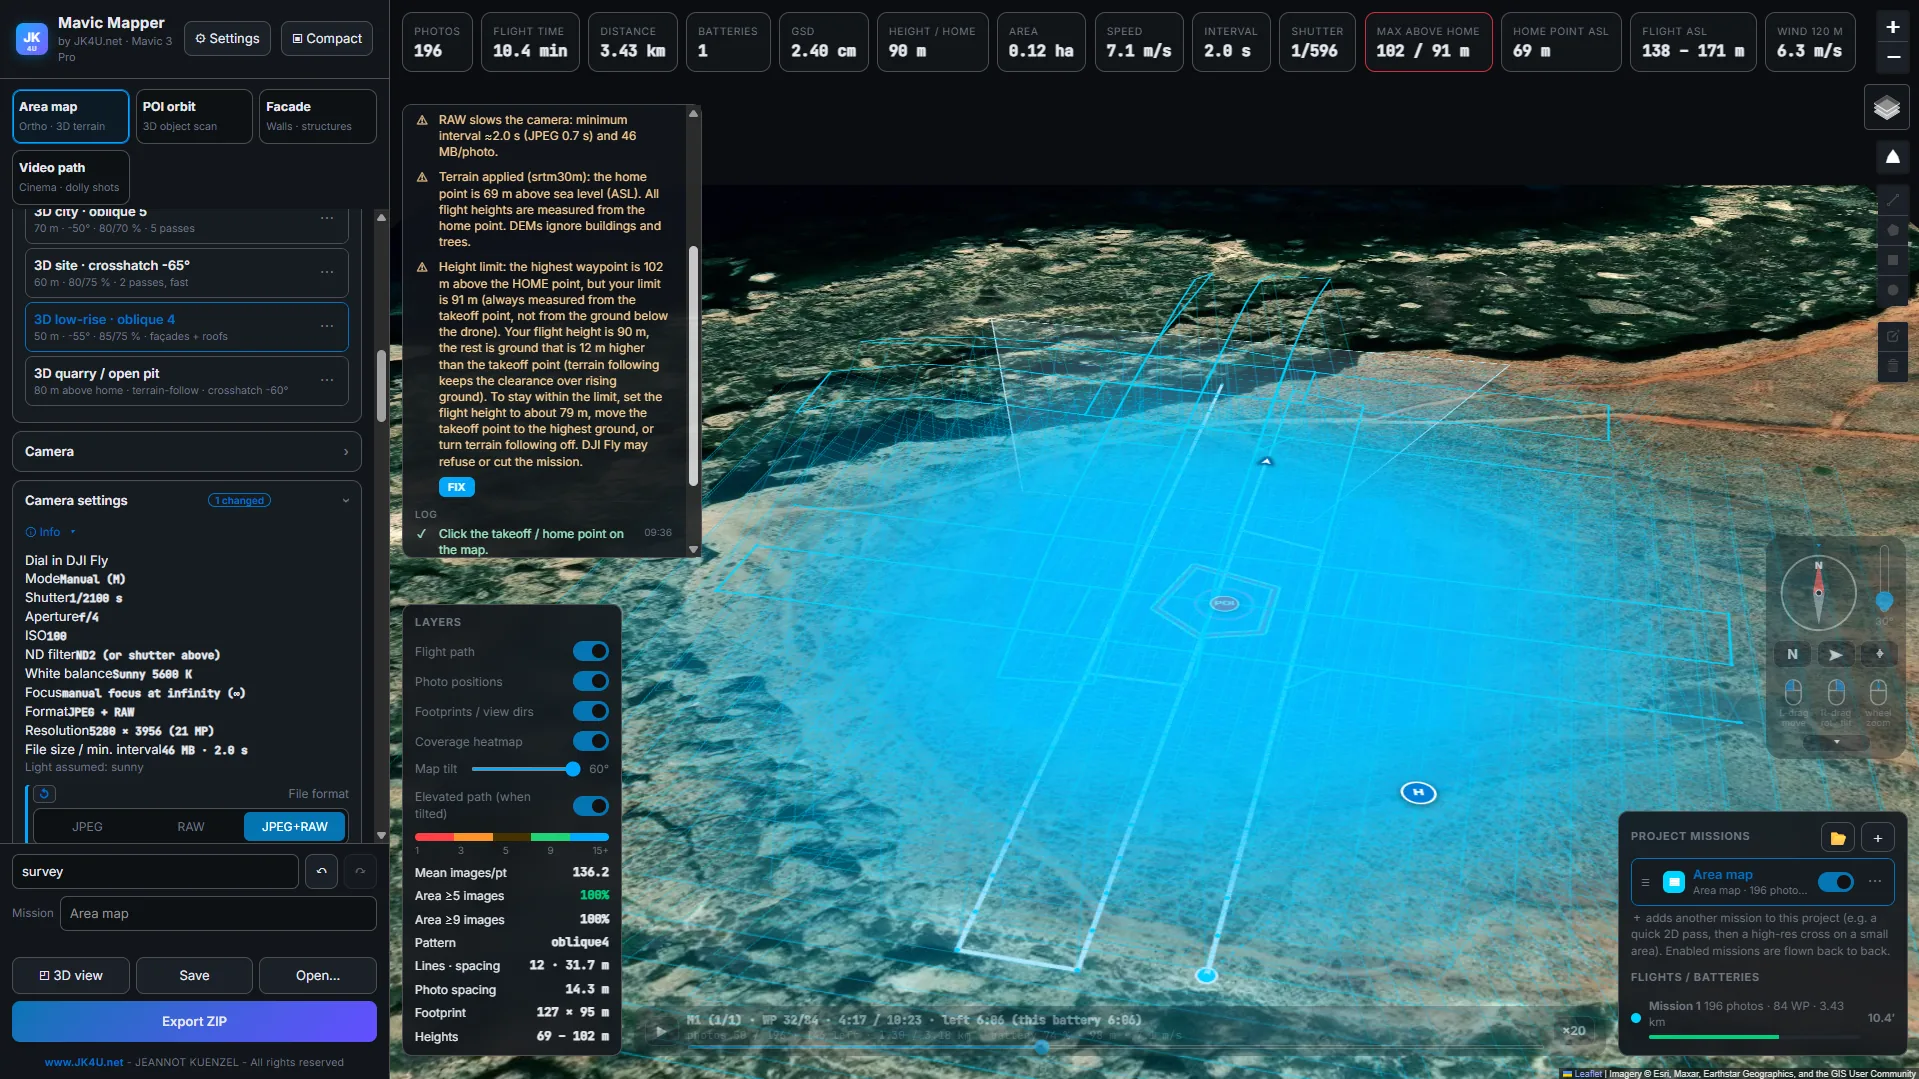
MavicMapper never plans in isolation. Weather, technical settings, mission properties and the flight type are all considered together – and each change is translated directly into the 3D flight-path preview, the photo count, the flight time, the battery plan and the warnings. You keep full, in-depth control of every aspect of the mission.
Weather
Wind speed & direction (scaled to flight height), temperature, light and sun. The planner turns legs into the wind, trims the battery budget in the cold and re-calculates shutter, ISO and ND.
Technical settings
Lens, shutter, aperture, ISO, format, overlaps, gimbal pitch, capture mode and speed – blur limit, photo interval and file volume follow instantly.
Mission properties
Area size, flight height, terrain, home point, object height and diameter, wall length, standoff, battery budget and height limits.
Flight setup & type
Grid, crosshatch, oblique 4/5, multi-ring orbit, façade rows, cinematic splines – chained and split across batteries.
Five drones, one planner
MavicMapper plans native DJI Fly waypoint missions for the Mavic 3 Pro, Mavic 4 Pro, Mini 5 Pro, Mini 4 Pro and Lito X1. Pick your aircraft once – every preview and demo on this page (Mission Lab, cameras, exposure advisor, settings school, wind and battery warnings) switches to that drone’s sensor, lenses, limits and defaults.
Spec pages: Mavic 3 Pro · Mavic 4 Pro · Mini 5 Pro · Mini 4 Pro · Lito X1
All aircraft and camera values on this page are the same tables the program uses (taken from DJI’s published specifications; where DJI publishes no figure the program uses a planning estimate, marked ≈ in the app – e.g. minimum photo intervals, file sizes and the default battery budgets). Wind, speed, gimbal and battery limits are applied in every demo. The Mavic 3 Pro is the most thoroughly tested aircraft. Always fly a short test mission first, and check local rules for your aircraft class.
Plan a mission right here
A live replica of the planner's maths – the same camera data, footprints, overlap, blur and battery logic. Drag the sliders, rotate the 3D view with your finger or mouse, press play and watch the drone fly it.
⚖️ The Mission Lab is an illustration and estimate, not flight data. Always check obstacles, airspace and local rules yourself. Disclaimers
Six jobs. Every function.
Real-world missions built from the app's own presets. Hit “Load in Lab” to fly them in the simulator above – then recreate them in MavicMapper in minutes.
92 presets. One tap.
MavicMapper ships with built-in shooting setups for mapping, inspection, 3D scanning, façades and cinema. Tap one to apply it – tweak – save your own as .mmpreset.json.
One drone, three cameras to plan for
Each Mavic 3 Pro camera has its own sensor geometry, aperture, minimum photo interval and file size. Move the altitude slider and see how footprint and GSD change per lens – it is synced with the Mission Lab’s flight height.
Understand every setting by playing with it
Five drawers, five key concepts – each with its own sliders and live graphics that use the same formulas as the planner. Open a drawer, drag, and see why the plan changes.
Photogrammetry finds the same ground point in many photos and triangulates it. Front overlap is how much a photo shares with the next one along the flight line; side overlap is how much it shares with the neighbouring line (for orbits: along the ring / between rings; for facades: along the row / between rows).
What the planner does: with your lens and altitude it computes the photo footprint on the ground and converts overlap into photo spacing (footprint × (1 − front)) and line spacing (footprint × (1 − side)). Change a slider – the plan, photo count, flight time and battery estimate follow immediately.
- 70 / 60 – fast, flat open ground, quick orthomosaic.
- 75–80 / 65–70 – everyday mapping and 3D models of buildings.
- 85–90 / 75–80 – trees, water, grass, repetitive textures (software needs more matches).
- Above ~90 – huge photo sets, long flights, little extra quality.
Rules of thumb, not guarantees – your processing software and scene decide. Tight spacing also limits how fast you may fly (camera minimum interval): see Auto capture & speed.
Pattern decides how many passes cover the area. Grid = one set of parallel lines (fastest). Cross adds a second pass at 90° (doubles the photos, far better 3D and fewer holes). Obl. 4 flies four tilted passes from four directions with the gimbal at −45…−60°; Obl. 5 adds a nadir pass for the best of both.
Course (0–179° or Auto) is the direction of the lines – auto picks an efficient one and can rotate it against the wind. Image long side across track gives a wider swath (fewer lines, faster), along track a deeper footprint. Heading: Fixed keeps the nose in one direction all mission, Nose fwd turns the aircraft along the path, Custom sets any angle. Gimbal pitch −90° looks straight down; shallower angles see walls and slopes. Line extension lets lines run past the border so the drone is straight and stable when the area starts.
The preview in the Mission Lab uses exactly these rules – try a crosshatch there and watch the photo count double.
All heights are measured above the takeoff (home) point – not above the ground. That is how DJI waypoint missions work, and why a hill, a slope or a tall tree changes your real clearance. Turn on terrain following to adjust waypoint heights to the ground, and set Max height and Min height warning so the planner flags anything outside your limits.
Takeoff safety height is where the drone climbs to before it flies to the first waypoint – set it above anything near home. Usable minutes per battery and max waypoints per mission decide how a big job is split into several KMZ files. Finish action (return home / land / hover / go to first waypoint) and Signal lost (return home / land / hover) are written into the file as the failsafe behaviour.
Limits help you plan; they never replace your judgement, local height limits or visual line of sight. See the disclaimers.
Failsafe behaviour
Battery & waypoint budget
One click on Load forecast & sun fetches an hourly forecast for the centre of your area (Open-Meteo – the only online call, optional, it needs just the coordinates) and calculates the sun position. You get a verdict: Good to fly (wind at 120 m ≤ 8 m/s, gusts ≤ 10.7 m/s, rain chance < 30 %), Marginal (≤ 11 / 12 m/s, < 50 %) or No-go, a 24-hour wind strip and the best light window (sun at least min(35°, noon − 10°)). The Mavic 3 Pro wind limit is about 12 m/s.
It is not just a display. The forecast wind feeds the plan: battery and drift estimates, the optional wind-optimised course and the on-screen wind particles. Sun and cloud feed the exposure advisor. You can override wind speed and direction by hand (Forecast = automatic). Cold lowers battery capacity – plan extra margin.
Forecasts are forecasts. Look at the sky, check local conditions and decide on site.
Stop & shoot flies to each photo point, settles, shoots and moves on – sharpest, slower. Distance and Timed shoot while flying – fast, but limited by two physical rules: motion blur and the camera’s minimum photo interval. Orbits and facades always stop & shoot.
- Blur (px) = speed × exposure time ÷ GSD.
- Fastest blur-free speed = max blur × GSD ÷ exposure time – a faster shutter or higher altitude lets you fly faster.
- Interval limit = photo spacing ÷ min interval – more overlap means slower flight.
- Stop mode: cycle = leg time + hover before + hold after trigger; the calculator recommends a hover time from wind and speed.
The live timing calculator in the app shows all of this and has Apply buttons for the recommended speed and hover. Speed and acceleration feed the time / battery estimates; DJI Fly flies its own speed profile, the file carries the speed per waypoint. Exposure itself cannot be stored in a waypoint file – the Light lab tells you what to dial in.
⚖️ Demos are simplified teaching models. The Mission Lab and the real program do the full calculation. Disclaimers
Never guess your camera settings 🔗 linked
Linked to the Mission Lab: pick a lens, light or shutter here and the Lab follows – and vice versa. Waypoint files cannot carry exposure – so the planner tells you exactly what to dial in DJI Fly: shutter, ISO, ND filter, white balance, focus. Try it for photos and video.
⚖️ Exposure values are suggestions – check them on the live view. Disclaimers
The planner talks to you
The most important rule in the app: all heights are above your home (takeoff) point. Place the ⌂ marker where you really launch – then the planner checks everything else.
⚖️ Visual line of sight, weather limits, crowds and local rules are the pilot's responsibility – the planner can only warn. Disclaimers
⌂ Home point = height reference
DJI expects waypoint heights relative to the takeoff point. MavicMapper does the same – and warns when the highest waypoint exceeds your height limit (default 120 m) measured from the home point, not from the ground below.
⛰ Terrain following
Switch it on and waypoint heights are corrected against real elevation data (SRTM, EU-DEM, ASTER or Mapzen), so ground clearance – and GSD – stay constant over hills. Try the toggle in the Area-map tab of the Mission Lab.
🧯 One-click FIX
Many warnings come with a FIX button that solves the problem by itself – and drops out again when no longer needed. Try it below.
Fly smart, then verify
Complex sites need different treatment in different places. Let OpenStreetMap find the buildings and trees – then close the loop with a post-flight gap analysis.
- Find asks OpenStreetMap for buildings and tree areas inside your outline and clusters them into zones.
- Per-zone tuning: own overlap, pattern (denser crosshatch / oblique for buildings), altitude multiplier and gimbal.
- Zone lines merge into the main plan and share the batteries.
- Zones only turns them into a small patch mission for re-flying.
Find the holes before the model does
Select the flown JPGs – their DJI position, yaw and pitch are read right in the browser. Red = fewer than N images.
- Analyze the photos against the plan.
- Create re-fly mission: gaps become ready-to-fly, zones-only patch missions.
- Back to full plan reverts at any time.
Big jobs, many batteries, one project 🔗 linked
Combine several missions into a project – the planner splits and balances them over batteries (including your current Mission Lab flight, with wind and temperature applied), and can resume from any waypoint after an interruption – see Mission pickup.
The drone flies straight home → waypoint at takeoff safety height – check that leg for the obstacle that stopped you.
Interrupted? Pick up exactly where you left off.
Batteries die, wind picks up, a bird shows up, you hit RTH on purpose. Land, swap, tell the planner the last waypoint you are sure was flown – and it builds a brand-new, flight-ready mission containing only what is left. No re-flying the whole area, no guessing, no gaps in your photogrammetry set.
ⓘ Info
- Mission aborted (obstacle, RTH, low battery)? Plan only what is left.
- Note the last waypoint you are sure was flown (DJI Fly numbers 1…n per mission). Tap its marker on the map.
- Earlier missions are dropped; this one is cut at that waypoint. Start N earlier re-shoots a few points for overlap.
- Drone flies straight home → waypoint (min. takeoff safety height): check that leg for the obstacle.
1 Tap a numbered waypoint on the map (or type its number) · 2 enable · 3 export: …resume_wpNN.kmz. Drone flies straight home → that waypoint, then continues.
- Land safely first. Interrupt or abort however you need to – pause, RTH, low-battery landing. The RC pause / RTH always overrides the mission.
- Find your last good waypoint. In DJI Fly the waypoints are numbered 1…n per mission. Note the last one you are sure was reached and shot. In MavicMapper tap that numbered marker on the map – or type its number into Last good waypoint # (DJI Fly numbering).
- Open the Resume mission card and switch on Resume an interrupted flight. Set Battery / mission #, check Last good waypoint #, and optionally raise Start N waypoints earlier (overlap safety) (2–3 is a good habit) so a few photos overlap the already-flown part.
- Export & upload. You get
…_resume_wpNN.kmz. Put it on the RC (USB upload or manual import) like any other mission, fly it – the drone goes straight home → restart waypoint, then continues the path as planned.
It cuts the plan, not corners
The interrupted mission is cut at your waypoint; finished missions are dropped. Interval-photo triggers that were running at that point keep running, so the capture pattern stays identical.
Everything is recalculated
Photos left, flight time, distance and battery estimate are rebuilt for what remains – including the transit from home to the restart point at your chosen transit speed.
Numbers stay consistent
Remaining missions keep their original numbers (M3 stays M3), so your dummy missions and macros in DJI Fly still line up. Weather, camera, speed and course settings are untouched.
It warns about the leg
The drone flies a straight line home → waypoint at no less than your takeoff safety height. The planner shows distance and bearing – check that leg for the obstacle that stopped you.
Interrupt as often as needed
Resume a resume: change the waypoint again after the next interruption. You can always switch the function off to get the full original mission back.
Works for every mission type
Area grids, orbits, facades and video paths – anything that has numbered waypoints. Ideal for large photogrammetry jobs spread over several batteries and several days.
Pro tips
- When unsure, go earlier. Re-shooting a few photos costs seconds; a gap in the model costs a whole new flight. Use Start N earlier generously.
- Resuming the next day? Light and weather differ – check the light check and wind settings, and avoid mixing very different lighting in one model.
- Same home point. Take off from the same spot (or re-set the home point) so the straight leg and heights match the plan.
- Unsure which waypoint? Use the gap check after the flight – it compares flown photos with the plan and shows what is missing.
- Always VLOS. You stay pilot in command: see safety & legal notes.
One project, as many missions as you like
A project bundles several missions – an area map, a tower orbit, a façade, a video shot – and flies the enabled ones back to back. Save and open whole projects, or manage each mission on its own: save, duplicate, open, delete, enable or disable. Try it below.
Project missions
📁 Projects & presets are plain files
Project (.mmproj.json): every mission with its map drawing – area, POI, wall line or camera path – plus all settings and the takeoff point. Preset (.mmpreset.json): shot settings only. They live in a local folder you choose (default Downloads/MavicMapper) – autosave and 100 undo steps included.
⋯ Every mission has its own actions
Edit opens it on the map · Duplicate clones it (perfect for a high-res second pass) · Save stores that single mission as its own project · Delete removes it (a project always keeps at least one). Tap a row to edit, swipe left or press ⋯ for the actions.
⏻ Enable / disable
The switch decides whether a mission is in the plan. A disabled mission stays in the project but is hidden on the map and not planned or exported – ideal for “maybe later” jobs and alternatives.
↕ Order = flight order
Enabled missions are flown back to back in list order (drag ≡ to reorder). Each piece starts where the previous one ended, and batteries are split across the whole chain.
Plug in. Click Upload. Your RC Pro just levelled up.
DJI Fly flies waypoint missions but gives you no way to bring your own in. MavicMapper closes that gap: it talks to your DJI RC Pro, RC 2 or Android phone over USB-C using ADB and drops finished missions straight into DJI Fly – bringing an RC Plus 2–style mission workflow to the controller you already own. No cloud, no copy-paste, no folder hunting.
- One click per battery. Mission 1 → slot 1, Mission 2 → slot 2 … MavicMapper writes each KMZ into the matching DJI Fly mission folder.
- Backs up first. Every replaced mission is saved to
rc_backups/and can be restored with one button. - Copies your drone IDs. It reads
droneEnumValueand the payload code from the dummy mission, so DJI Fly accepts the file for your aircraft. - Verifies the transfer. File size is checked after the push; failures are reported per mission.
- Restarts DJI Fly for you. Force-stop and relaunch, so the new mission shows up immediately.
- Installs ADB by itself. Google's platform-tools are downloaded automatically – nothing to set up by hand.
How it works – six steps, once
Create dummy missions
In DJI Fly, save one simple 2-point waypoint mission per battery. They are placeholders: each one creates a mission slot on the controller.
Enable USB debugging
On the RC: Settings → About → tap the build number 7× to unlock Developer options, then switch on USB debugging. Menu names vary a little by controller and Android version.
Connect with USB-C
Plug the RC into your computer, unlock it and accept the “Allow USB debugging?” prompt. Tick Always allow for this computer.
Install ADB & detect
Press Install ADB tools (one time), then Detect RC. Your controller and every saved mission slot appear in a list – newest first.
Assign mission → slot
Auto-assign pairs the missions with your dummy slots – or choose manually. Each slot shows its date, size and waypoint count so you can't pick the wrong one.
Upload & fly
Press Upload. DJI Fly restarts, you open the mission, set camera settings from the summary and launch. Next battery, next mission.
Three ways to reach your controller
🔌 ADB over USB
Works with DJI RC Pro, RC 2 and Android phones running DJI Fly – including newer Android versions that block normal file access to Android/data.
- Auto-downloads Google platform-tools
- Detects the right DJI Fly package
- Backup · upload · verify · restart
🪟 Windows file transfer (MTP)
No ADB needed: Windows sees the controller as a portable device and MavicMapper writes through it.
- Windows only
- Same slot list and backups
- No automatic app restart – reopen DJI Fly yourself
📡 Directly on the RC
Run the planner on the controller itself: with the on-RC helper it talks to the RC's own ADB service – no computer in the field.
- Set up once from the PC installer
- Plan, upload and fly from the same device
- Falls back to direct file access where Android allows it
| Per mission | Doing it by hand | MavicMapper USB upload |
|---|---|---|
| Find the right folder | Browse GUID folders, compare dates | Slot list with date, size, waypoints |
| Rename the KMZ | Must match the dummy file name exactly | Automatic |
| Drone ID in the file | Wrong ID = DJI Fly rejects it | Copied from the dummy mission |
| Backup of the old file | You remember to copy it | Always, with 1-click restore |
| 5 batteries | 5 × the whole routine | One Upload press |
⚖️ Copying or replacing mission files on your controller is done entirely at your own risk. No warranty, no support. Disclaimers
Prefer to do it by hand, or don't have a cable at the field? See the manual step-by-step guide below. Always keep the aircraft in visual line of sight and test every new mission slowly.
How to get a waypoint mission into DJI Fly by hand
No ADB, no problem. DJI Fly can't import a KMZ directly, but there is a well-known trick: replace the file of a placeholder mission. The steps are the same for any KMZ in DJI's WPML format – including the ones MavicMapper exports.
Export your mission
In MavicMapper press Export. Unzip the result: you get one mission_01.kmz per battery. The file must be in WPML format (DJI's standard) – a plain Google Earth KML will not work.
Create a placeholder mission in DJI Fly
On the controller (or phone), open DJI Fly → Waypoint → add two points anywhere, save it and give it a name. Create one placeholder per KMZ you want to import.
Open the controller's file system
Connect the RC to your computer with USB-C (or use a file manager on the device) and browse to:
Android/data/dji.go.v5/files/waypoint/Each saved mission lives in its own folder named with a long GUID. On newer Android versions the Android/data folder is hidden from apps and some file managers – use a PC, a microSD workaround or the ADB method above.
Find your placeholder's folder
Sort the folders by modified date: the most recently created one is your placeholder. Inside is a single .kmz named exactly like the folder (the GUID).
Swap the file
First copy the original somewhere safe (backup). Then rename your own KMZ to exactly the same file name as the placeholder's KMZ, delete the placeholder file and copy yours into the folder. DJI Fly only updates missions by overwriting that exact file name.
Reopen the mission in DJI Fly
Force-close DJI Fly (swipe it away) and open it again. Open the placeholder mission: the waypoint editor loads your route and the thumbnail updates. Check heights, speed, gimbal and actions – and set the RTH height.
Set camera settings, then fly
Waypoint files cannot carry exposure. Open MavicMapper's summary.txt and dial in shutter, ISO, ND filter, white balance and focus by hand. Fly within visual line of sight, then repeat for the next battery.
⚖️ Manual file changes are at your own risk – always keep a backup. DJI Fly menus and folders can change with updates. Disclaimers
Background & further reading: Litchi Utilities – DJI Fly waypoint KMZ import · MavicPilots – where waypoints are stored · MavicPilots – back up, export & import · Dronelink – onboard waypoint missions to KMZ. Folder layout and menu names can change with DJI Fly updates.
What you get when you press Export 🔗 live
One ZIP: a DJI WPML KMZ per battery with photo, hover, gimbal, yaw and recording actions, a Google-Earth overview, a plain-text briefing and WebODM options. Below is a live preview built from your current Mission Lab settings.
One KMZ per battery
Automatic splitting with balanced flight times, plus a resume helper.
Template matching
Read a KMZ created by DJI Fly so the output matches your aircraft and payload exactly.
Google Earth overview
Fly the mission virtually before you leave the office.
Your planner, your rules
MavicMapper adapts to your screen, your remote controller and your habits. Try the accent colour – this whole page re-themes.
Desktop or compact layout
Large-screen cockpit, or a compact touch layout that works beside the RC clock and battery bar (top-bar clearance is adjustable).
Base maps
Google hybrid, Google satellite, Esri satellite or dark streets.
Slider ranges
Set your own min / max for any slider.
My defaults
Make the current settings your starting point.
100 undo steps
Undo / redo with adjustable history, plus autosave.
Plain local files
Projects and presets are JSON files in a folder you choose.
Pilot's cheat sheet
Overlap & gimbal
| 2D ortho | 75 / 65 %+ · −90° |
| 3D reconstruction | 80 / 70 %+ · −50…−65° |
| Vegetation | 85 / 80 % |
| Façade | 80 / 70 % · 0° (perpendicular) |
Video speed vs. distance
| Close (10–20 m) | 1.5–3 m/s |
| Mid (30–60 m) | 3–6 m/s |
| Landscape | 8–12 m/s |
| Yaw / gimbal, slow move | ≤10–15 / 5–8 °/s |
Cinematic camera
| Frame rate | 24 / 25 / 30 fps |
| Shutter angle | 180° = 1/(2·fps) |
| Codec / res | H.265 · 5.1K / 4K |
| Test run | 50 % speed first |
The whole flight loop is coming
Beyond planning and USB upload, these tools are on their way to the native edition:
🧭 Fly assistant
A pre-flight checklist, one-tap mission preparation and a hold-to-start button.
- Prepare Mn opens the right mission in DJI Fly
- Record your own tap macros – open, start, pause, resume
🧪 ODM processing
Send the photos to NodeODM / OpenDroneMap and get results back.
- Orthophoto, DSM and 3D model, options tuned to the mission
- Quality presets: fast · balanced · high
📐 Results & measuring
Review results on the map and measure what changed.
- Distance, area and stockpile volume
- Change detection A → B: raised in red, lowered in blue
Your sites. Your data.
Your computer.
One native executable – no Python, no installer, no server, no account. Planning happens entirely on your machine; only optional lookups use the internet. The planning engine is compiled native code, verified against the reference planner on 56 plan scenarios, 56 export bundles and the terrain, zone, gap-analysis and import functions.
Everything MavicMapper can plan – the complete index
All 92 built-in presets, the six cinematic shot recipes and the step-by-step tutorials for the DJI waypoint planner, in one searchable list.
2D mapping
- Ortho · fast (area map) – 80 m · 80/70 % · ~2 cm/px · moving
- Ortho · high detail (area map) – 45 m · 85/75 % · stop & shoot
- Ortho · large area (area map) – 115 m · 75/65 % · max coverage per battery
- Ortho · medium tele 48 MP (area map) – 90 m · 80/70 % · long standoff, low perspective
- Ortho · vegetation / crops (area map) – 70 m · 85/80 % · low texture, wind-moved canopy
- Corridor · road / pipeline / river (area map) – 60 m · 80/60 % · narrow polygon
- Ortho · hilly terrain (area map) – 70 m above home · terrain-follow · 80/75 %
Inspection & volumes
- Construction progress (area map) – 60 m · 80/70 % · repeatable, same settings each visit
- Stockpile / volume (area map) – 50 m · crosshatch · 80/75 % · place GCPs
- Roof / solar survey (area map) – 35 m · 85/75 % · stop, RAW for glare recovery
3D mapping (oblique)
- 3D city · oblique 5 (area map) – 70 m · -50° · 80/70 % · 5 passes
- 3D site · crosshatch -65° (area map) – 60 m · 80/75 % · 2 passes, fast
- 3D low-rise · oblique 4 (area map) – 50 m · -55° · 85/75 % · façades + roofs
- 3D quarry / open pit (area map) – 80 m above home · terrain-follow · crosshatch -60°
High-res · medium tele 48 MP (slow & smooth)
- Tele 48 MP · ultra-res ortho 40 m (area map) – 0.25 cm/px · 85/75 % · stop & shoot · 3 m/s, soft accel
- Tele 48 MP · 0.4 cm ortho 60 m (area map) – 0.37 cm/px · 80/75 % · stop & shoot · 3 m/s
- Tele 48 MP · smooth continuous 80 m (area map) – 0.5 cm/px · 80/70 % · ~2.5 m/s glide, ≤0.3 px blur
- Tele 48 MP · wide high-res 120 m (area map) – 0.74 cm/px · 80/70 % · continuous, fewest batteries
- Tele 48 MP · roof / façade-top detail (area map) – 50 m · crosshatch -80° · 85/75 % · stop
- Tele 48 MP · floor art / mosaic / graffiti (area map) – 30 m · 0.18 cm/px · 85/80 % · stop, RAW
More area maps
- Archaeology / excavation (area map) – 25 m · 0.7 cm/px · 85/80 % · stop, slow
- Coastline / beach (area map) – 70 m · 80/70 % · continuous · nose first
Buildings
- House / small building (POI orbit) – 10 m high · auto rings · top cap
- Large building / hall (POI orbit) – 25 m high · 40 m wide · top cap · 85 % front
- Ruin / heritage site (POI orbit) – 12 m · RAW · dense rings, 85/75 %
Tall structures
- Tower / church / monument (POI orbit) – 40 m high · 12 m dia
- Mast / chimney / pylon (POI orbit) – 50 m high · 3 m dia · 12 m standoff
- Wind turbine tower (POI orbit) – 80 m high · 6 m dia · 20 m standoff
Objects
- Statue / sculpture (POI orbit) – 5 m high · 6 m standoff · 3 rings
- Vehicle / machinery (POI orbit) – 3 m high · 5 m dia · 3 rings · top cap
- Monument · tele 48 MP (POI orbit) – 12 m · 25 m standoff · long lens, no perspective
High-res & more objects
- Tower · tele 48 MP ultra detail (POI orbit) – 30 m high · 35 m standoff · 85/75 % · slow
- Statue · tele 48 MP from afar (POI orbit) – 6 m · 20 m standoff · no perspective distortion
- Church / chapel · tele 48 MP (POI orbit) – 20 m high · 25 m dia · 30 m standoff · top cap
- Single tree (POI orbit) – 12 m high · 10 m crown · 12 m standoff
- Rock / boulder / outcrop (POI orbit) – 8 m · 10 m dia · 3 rings + top
- Lighthouse (POI orbit) – 35 m high · 8 m dia · 18 m standoff
- Bridge pier / column (POI orbit) – 15 m high · 4 m dia · 8 m standoff
- House · quick continuous (POI orbit) – 10 m · 15 m dia · fly-through, sunny light
Façades & faces
- Building façade (façade) – 10 m standoff · 3-20 m
- High-rise façade (façade) – 20 m standoff · 5-80 m · -5° pitch
- Heritage façade · tele detail (façade) – 30 m · medium tele 48 MP · 85/75 %
- Cliff / quarry face (façade) – 25 m standoff · 5-60 m
- Dam / retaining wall (façade) – 15 m · 2-40 m · -10° pitch · crack detail
High-res & more faces
- Façade · tele 48 MP ultra detail (façade) – 25 m standoff · 0.15 cm/px · 85/80 % · slow stop
- Façade · tele 48 MP smooth glide (façade) – 30 m · continuous ≤0.3 px blur
- Rock face · tele 48 MP (façade) – 40 m standoff · 5-50 m · stop
- Church front / portal (façade) – 12 m · 2-25 m · 85/75 %
- Bridge side / girders (façade) – 20 m · 2-20 m · -5°
- Ship hull / boat side (façade) – 8 m · 1-12 m · 85/75 %
- Street front (long) (façade) – 15 m · 3-18 m · continuous
- Warehouse / hall wall · fast (façade) – 15 m · 2-12 m · 75/65 %
Property & architecture
- Property · slow glide (video) – 2 m/s · 5.1K/24 · max smoothing
- Property · push-in (video) – 1.5 m/s · 4K/24 · straight, locked heading
- Pedestal rise & reveal (video) – 2.5 m/s · 1.5 m/s climb · tilt-down reveal
- Dolly · Inspire-style (video) – 2.5 m/s · floating, soft starts
- Reveal · slow push-in (video) – 3.5 m/s · 4K/24
Landscape & travel
- Landscape · high glide (video) – 6 m/s · 5.1K/24 · wide, stable
- Ridge / cliff reveal (video) – 4 m/s · climb + tilt-down
- Coast / water run (video) – 7 m/s · 4K/30 · low pass
- Fly-by · medium (video) – 8 m/s · 4K/30
- Blue hour / low light (video) – 2.5 m/s · 4K/24 · 180° shutter, low speed
Action & slow-motion
- Tracking · follow (video) – 9 m/s · 4K/60 · fast yaw
- Fast chase (video) – 12 m/s · 4K/30
- Slow-mo fly-by (video) – 10 m/s · 4K/120 · 1/240 shutter
- Site progress video (video) – 5 m/s · 4K/30 · repeatable path
Long lens
- Tele compression pass · 166 mm (video) – 5 m/s · 4K/30 · ≥ 30 m standoff, slow yaw
- Medium tele lateral track · 70 mm (video) – 6 m/s · 4K/30 · parallel to subject
Smooth & long lens · more
- Medium tele 70 mm · float past (video) – 2 m/s · 4K/24 · ≥ 25 m standoff, soft starts
- Medium tele 70 mm · slow arc (video) – 1.5 m/s · 4K/24 · parallax on the subject
- Ultra-slow crawl (video) – 1 m/s (DJI Fly minimum) · 5.1K/24 · micro move, max smoothing
- Top-down glide (video) – 3 m/s · 4K/30 · gimbal -90°, straight
- Forest edge / tree line (video) – 3 m/s · 4K/24 · low, gentle curves
- City night · slow (video) – 2 m/s · 4K/25 · low light
- Rising spiral reveal (video) – 3 m/s · 5.1K/24 · climb 1 m/s
- Tele 166 mm · compressed push-in (video) – 1.5 m/s · 4K/30 · far subject
Hi-res footprints
- Site overview · to the horizon (hi-res footprint) – 60 m · nadir + rings up to 0° · hasselblad
- Ground footprint · no sky (hi-res footprint) – 50 m · rings up to -30°
- Tele 48 MP · ultra-res footprint (hi-res footprint) – 40 m · rings up to -35° · slow
- Tele 48 MP · super-res to horizon (hi-res footprint) – 80 m · rings up to 0° · slow
- Village / valley · high (hi-res footprint) – 120 m · rings up to -5°
- Low courtyard footprint (hi-res footprint) – 20 m · rings up to -20°
- Nadir + 1 ring · quick (hi-res footprint) – 60 m · rings up to -60°
- Tele 166 mm · close detail footprint (hi-res footprint) – 80 m · nadir + rings up to -55° · one battery
Parallel panoramas
- Skyline · single row (panorama) – 150 m path · 300 m away · hasselblad
- Skyline · tele 48 MP · 3 rows (panorama) – super-res · 200 m path · 400 m away · slow
- Gigapixel wall · tele 48 MP · 5 rows (panorama) – 300 m path · 500 m away · 2 up + 2 down
- Coastline wide (panorama) – 400 m path · 600 m away · 1 row down for the shore
- Mountain ridge · tele 48 MP (panorama) – 250 m path · 1 km away · 2 rows up
- Street front · close (panorama) – 120 m path · 40 m away · 3 rows
- Harbour / waterfront · 3 rows (panorama) – 200 m path · 250 m away
- Tele 166 mm · detail strip · 2 rows (panorama) – 150 m path · 600 m away · ultra detail
Shot recipes
Push-in (dolly in)
- Straight track toward the subject, slow. Camera locked on it.
- Look: POI. 3 points, height 30 → 14 m, 2 s hold at each end.
- Use: reveal detail, build tension. Subject grows, background compresses.
Pull-out (dolly out / reveal)
- Start close and low on the subject, retreat and rise.
- Look: POI. Height 10 → 40 m.
- Use: end shot, reveal the setting around the subject.
Truck (lateral slide)
- Straight sideways track past the subject, camera fixed to the subject direction.
- Look: fixed heading, gimbal −8°, constant 15 m. Standoff 30 m.
- Use: parallax, foreground passing the subject. Keep speed ≤ 4 m/s.
Crane / pedestal up
- Near-vertical rise with slight forward drift; gimbal tilts down while rising.
- Look: fixed heading, gimbal −3° → −35°, height 4 → 50 m.
- Use: reveal a landscape behind a foreground object.
Orbit arc around subject
- 180° arc at constant radius and 25 m height; subject stays centred.
- Look: POI. Radius = distance / 2 (min 25 m).
- Use: hero shot. Slow speed (2–3 m/s) for a floating look.
Fly-over / tracking path
- Gentle S-curve path, camera looks along the direction of travel.
- Look: along path, gimbal −15°, height 35 → 30 m.
- Use: follow a road / coast / river. Medium speed (8 m/s).
Tutorials
Area map (2D / 3D)
- Area map (rail) → polygon / rectangle tool (top right), or import KML / KMZ.
- ⌂ Place takeoff at the real launch spot (height reference).
- Pick a preset, or set Camera → Flight height → Overlap → Pattern.
- 2D ortho: Grid, gimbal −90°, overlap 75 / 65 %+. 3D: Oblique 5 or Cross, gimbal −50…−65°, 80 / 70 %+.
- Capture: Distance (fast) or Stop & shoot (sharp). Speed Auto.
- Hilly site: Terrain following ON (needs ⌂).
- Check cards (time, batteries, GSD, max above home) and warnings. Optional: Side-look, Detail zones, Wind.
- Export ZIP or Upload to RC → Fly tutorial.
Orbit (object 3D)
- Switch mode to Orbit. ⌖ Place POI at the object centre.
- Set object height + diameter. Distance / rings: Auto or manual.
- Optional: Nadir top cap for roofs; direction, start bearing.
- ⌂ Takeoff marker for ring start; Terrain ON if ground differs from home.
- Check ring heights (above home) vs. max height.
- Export / Upload. Mission stops & shoots at each waypoint.
Facade (wall)
- Switch mode to Facade. Draw a line along the wall base (line tool, top right).
- Pick flight side (left / right of line) and distance to wall.
- Set lowest / highest row (above home). Gimbal 0° = perpendicular.
- Overlap 80 / 70 %+. Mind obstacle sensing near the wall.
- Export / Upload. Stop & shoot per waypoint.
Video shot (dolly)
- Mode Video. Pan the map to the subject.
- Fastest start: Video → Shot recipes → pick (Push-in, Pull-out, Truck, Crane, Orbit arc, Fly-over) → direction + distance → + Insert. Then tune.
- Manual: ⌂ takeoff at the launch spot → + Add waypoint → tap the track → ✓ Done. Drag pins.
- Per point: height above home, speed (0 = cruise), hold (use 2 s at both ends as edit handles).
- Look per point: POI (lock on subject), fixed heading (truck / crane), path (flight direction). Gimbal: angle / aim at POI / level.
- Path & smoothing: roundness 0.8–0.9, ease 0.8+, low accel limits = floaty dolly; raise for energetic.
- Shot preview: scrub; check speed, yaw rate, pitch. No spikes, no warnings.
- Video camera: fps 24 / 25 / 30, 180° shutter, ND to match. Set the same in DJI Fly.
- Export / Upload, take off at home, start in DJI Fly. First run at reduced speed.
Shot design (dolly basics)
- Dolly ≠ flying the camera. Path decides where the drone goes, Look decides where the camera points. Dolly feel = translate smoothly while the view stays locked (POI or fixed heading), not “along path”.
- Subject lock (POI): push-in, pull-out, arc. Fixed heading: truck, crane (parallax, straight verticals). Along path: fly-over, tracking.
- Speed: apparent motion = speed ÷ distance to subject. Close (10–20 m): 1.5–3 m/s. Mid (30–60 m): 3–6 m/s. Far / landscape: 8–12 m/s.
- Smoothness: few points, long gentle legs. Ease in/out ≥ 0.8, roundness 0.8–0.9. Yaw ≤ 10–15 °/s, gimbal ≤ 5–8 °/s for slow moves.
- Keep 2 s holds at start and end (edit handles). Start and end on a stable frame.
- Height: all heights above home point. Lower = more parallax and speed feel; higher = map-like. Check clearance on the preview and with Terrain ON.
- Camera: 24 / 25 fps + 180° shutter (1/48–1/50) for cinematic blur, ND as advised. 5.1K / 4K H.265; fix white balance.
- Autofocus: Shot preview shows focus distance + sharp zone per moment (POI in frame → POI; else ground point under the view centre; else ∞). Short lens / 4K: hyperfocal ≈ 6 m → MF at the shown distance, no hunting. Big focus range + subject close → AF-C on the subject.
- Check in 3D: map tilt (3-finger drag, right-drag, ⛰, Layers slider) shows the elevated path; 3D view shows frustum, focus plane, sharp zone and the camera view (📷).
- Safety: VLOS, obstacles along the whole spline, wind < 8 m/s for slow moves, fly a test at 50 % speed first.
- Recipes: Video → Shot recipes inserts any of these as editable waypoints around the map centre.
Detail zones + re-fly gaps
- Grid mode with a survey polygon.
- Detail zones: 🏢 Find (OSM buildings / trees) or + Draw zone → tap corners → Finish.
- Tune per zone: overlap, pattern, altitude ×, gimbal. Zones only = patch mission.
- After the flight: Gap check → select JPGs → Analyze.
- Red = under-covered. Create re-fly mission → export. Back to full plan to revert.
Upload & fly
- Create one saved dummy waypoint mission (2 pts) per battery in DJI Fly.
- Remote controller: USB-C → Detect RC (ADB or MTP; RC Pro on Termux: direct).
- Assign mission → slot → Upload. Backups in
rc_backups/. - FLY (rail): pre-flight checklist, Prepare Mn (opens it in DJI Fly via macro), check screenshot, Hold to START.
- Macros: Record once (Open Mn, Start, Pause, Resume), test, save.
- VLOS. RC pause / RTH always overrides. Swap battery → next mission.
- Optional: Live tab follows the flight log on the map (API key).
Process & measure
- Copy photos (SD) to a folder. Start NodeODM (Automatic processing → Docker).
- Folder → quality → Upload & process. Result in
odm_*. - Results: folder → Scan → Orthophoto / Heights overlay.
- Measure: distance / area. Volume: Outline a pile, choose base → Finish.
- Change: Set A (old), Set B (new) → Compare A → B.
- Needs numpy, tifffile, pillow on the PC.
Side-look shots
- Grid mode, terrain following for slopes.
- Side-look shots ON: sides, side pitch, every N points.
- Slope ON: side pitch follows terrain normal.
- Capture Stop or Distance (hybrid). Expect longer flight time.
- Test a short run in DJI Fly first.
Quick answers
Is MavicMapper really free?
Yes. JK4U MavicMapper is free of charge and without restrictions: no trial timer, no licence key, no subscription, no account and no locked features.
Does the DJI waypoint planner work offline?
Yes. Planning runs entirely on your computer. Only optional lookups – map tiles, terrain elevation (DEM), OpenStreetMap zones, place search and weather – use the internet.
Which DJI drones does it support?
MavicMapper plans native DJI Fly waypoint missions for five aircraft: the Mavic 3 Pro (Hasselblad 24 mm, tele 70 mm, tele 166 mm), the Mavic 4 Pro (Hasselblad 100 MP / 25 MP binned, 70 mm and 168 mm tele), the Mini 5 Pro (1-inch, 50 MP / 12.5 MP), the Mini 4 Pro (1/1.3″, 48 MP / 12 MP) and the Lito X1 (1/1.3″, 48 MP / 12 MP). Choose the drone in the planner’s Camera section and sensor geometry, photo modes, wind limit, speed limits, gimbal range and battery defaults follow. Camera values for the newer aircraft are planning figures from DJI’s spec sheets (some marked ≈ where DJI publishes none), so always fly a short test mission first. See the aircraft comparison.
How do I get a waypoint mission into DJI Fly?
Two ways: let MavicMapper upload it over USB-C with ADB (one click per battery, with automatic backup), or follow the manual guide: create a placeholder waypoint mission in DJI Fly, then replace its KMZ file in Android/data/dji.go.v5/files/waypoint with your own, renamed to the same file name.
How does the USB / ADB upload to the DJI RC Pro work?
MavicMapper installs Google's ADB platform-tools automatically, detects your controller over USB-C, lists the mission slots created by your placeholder missions and pushes each KMZ into its slot. It backs up the replaced mission, copies the drone ID codes, verifies the file size and restarts DJI Fly.
Do I need to know ADB?
No. ADB (Android Debug Bridge) is only the transport. MavicMapper downloads it for you; you just enable USB debugging on the controller once and accept the prompt.
Which controllers can I upload to?
DJI RC Pro, DJI RC 2 and Android phones running DJI Fly via ADB, plus Windows file transfer (MTP) as a fallback and an on-RC mode where the planner runs on the controller itself.
Is overwriting a mission on my controller safe?
The original mission file is backed up to a local rc_backups folder before every upload and can be restored with one button. Only the placeholder missions you assign are touched.
Are all flight heights above the home point?
Yes. DJI waypoint missions use heights relative to the takeoff point, and MavicMapper does the same. Place the home marker where you actually launch; the planner warns when the highest waypoint exceeds your height limit (default 120 m) measured from the home point.
Are the camera settings saved in the mission?
No. Waypoint files cannot carry exposure. The planner calculates shutter, ISO, aperture, ND filter, white balance and focus for you to set in DJI Fly, and writes them to summary.txt.
What overlap and altitude should I use for photogrammetry with my DJI drone?
For 2D orthomosaics use about 75/65 % front/side overlap with the gimbal at −90°; for 3D models use 80/70 % or more with an oblique pattern and −50° to −65° gimbal. At 80 m the Hasselblad camera gives roughly 2.1 cm/px; the Mission Lab on this page calculates GSD, photos and flight time for any setting.
Can it plan 3D models, orbits and façade scans?
Yes: crosshatch and oblique 4/5 grids, multi-ring POI orbits with a nadir top cap, and façade scans with perpendicular rows – each with live photo count, GSD, flight time and battery estimates.
Does it support terrain following?
Yes. Waypoint heights can be corrected with real elevation data (SRTM, EU-DEM, ASTER or Mapzen) so ground clearance and GSD stay constant over hills. DEMs ignore buildings and trees, so always check obstacles.
Can it plan cinematic video missions?
Yes. Six shot recipes (push-in, pull-out, truck, crane, arc, tracking) built on smooth spline paths with point-of-interest or fixed look modes, yaw and gimbal limits, easing and automatic exposure advice for 5.1K/4K video.
Can I process the photos in WebODM or OpenDroneMap?
Yes. Each export includes webodm_options.json tuned to the mission with fast, balanced and high quality presets.
How do I continue a mission after an interruption or low battery?
Land, then in MavicMapper switch on “Resume an interrupted flight”, pick the mission number and tap the last waypoint you are sure was flown (optionally start N waypoints earlier for overlap). The planner drops finished missions, cuts the interrupted one at that waypoint, recalculates photos, time and distance and exports a new KMZ (…_resume_wpNN.kmz). The drone flies straight home to that waypoint at the takeoff safety height, then continues – check that leg for obstacles.
How many batteries will my mission need?
The planner splits missions by battery budget (22 minutes default), balances the flights and writes one KMZ per battery; a resume function restarts from any waypoint after an interruption.
Is it safe to fly the plans blindly?
No. Always fly within visual line of sight, respect geo-zones and local rules, check every path for obstacles (trees, wires, cranes), set RTH height in DJI Fly and test each new setup on a small, open area first. The RC pause / RTH always overrides a mission.
Who is responsible for flights planned with MavicMapper?
The remote pilot alone. MavicMapper is a planning aid: you must keep the drone in visual line of sight, comply with the rules of your national aviation authority (for example FAA, EASA or CASA), stay out of restricted airspace and TFRs, hold the required registration and licences, respect privacy and carry any insurance that applies. See the full disclaimers on this page.
Is there a warranty, support or service?
No. The software and this website are provided free of charge, as is, without warranty. No service or support is provided, and no responsibility or liability is accepted under any circumstances for the use of the software.
Does the planner consider wind and weather?
Yes. Wind speed and direction (scaled to flight height) and temperature feed into the plan: legs can be turned into the wind, the usable battery time is reduced in strong wind and cold, and warnings appear when conditions exceed the aircraft's limits. Light conditions drive the recommended shutter, ISO and ND filter. The Mission Lab on this page shows the effect live.
My browser or Windows blocks the .exe download – what now?
Download the .zip version instead, unpack it and run the JK4U-Mavic-Mapper.exe inside. Windows SmartScreen may still ask for confirmation for unsigned programs.
Fly responsibly – legal, safety & liability
MavicMapper helps you plan. It does not fly, supervise or insure anything. You – the remote pilot – decide whether and how a flight happens.
⚖️ Legal & regulatory
- Pilot responsibility: the remote pilot is solely responsible for avoiding collisions and ensuring the drone is operated in a safe manner.
- Local regulations: compliance with national aviation authorities (e.g. FAA in the US, EASA in Europe, CASA in Australia) is mandatory.
- No-fly zones: operations are strictly prohibited in restricted airspaces, temporary flight restriction (TFR) zones and near airports without explicit authorization.
- Registration and licensing: drones must be properly registered, and pilots must hold the required certificates or licenses for their specific class of operation.
🔒 Privacy & liability
- Privacy rights: respect the privacy of individuals and avoid capturing recognizable images or footage of people or private property without consent.
- Property damage: the operator assumes all liability for bodily injury, death or property damage resulting from the operation of the drone.
- Insurance requirements: depending on the region and whether the flight is commercial or recreational, public liability insurance may be legally required.
🛠️ Operational & environmental
- Visual line of sight: keep the drone within the direct, unaided visual line of sight (VLOS) of the pilot at all times.
- Crowd restrictions: flying directly over unprotected groups of people, public events or moving vehicles is strictly prohibited under standard rules.
- Weather conditions: do not operate in high winds, rain, fog or heavy snow, which can cause component failure or loss of control.
- Night flying: operations at night typically require specific lighting (anti-collision strobes) and, in some jurisdictions, specialized training or waivers.
🔋 Technical & pre-flight
- Pre-flight inspection: perform a thorough pre-flight check of the aircraft, battery health and control links before takeoff.
- Signal interference: radio-frequency or magnetic interference can cause a loss of signal or “flyaway” events; pilots fly at their own risk in high-interference areas.
- Plans are estimates: flight times, battery use, GSD, wind effects, terrain data (DEMs ignore buildings and trees) and exposure advice are calculations, not guarantees. Test every new mission slowly on a small, open area.
🚫 No warranty · no service · no responsibility
JK4U MavicMapper, its documentation, this website and the Mission Lab are provided “as is”, free of charge and without warranty of any kind, express or implied – including fitness for a particular purpose, accuracy, reliability or availability. No service, support or updates are provided or promised. The author accepts no responsibility or liability under any circumstances for the use of, or inability to use, the software or any information on this site – including loss of or damage to aircraft, equipment, data or property, injury, death, fines or legal consequences. By downloading or using it you accept that you use everything at your own risk.
Not affiliated with, endorsed by or connected to DJI. DJI, Mavic, DJI Fly, DJI RC and related marks are trademarks of their respective owners. Third-party tools and services mentioned (ADB, OpenStreetMap, elevation data providers, WebODM / OpenDroneMap) are subject to their own terms.
 100% FREE · NO RESTRICTIONS
Ready for take-off?
Download MavicMapper and plan your first mission in minutes.
Some browsers or Windows 11 block direct .exe downloads. In that case use the .zip: unpack it and run the JK4U-Mavic-Mapper.exe inside – that’s all.
What’s new:
- Panorama: gimbal settles before each photo
- Corners: full stop + in-place yaw; continuous capture on straights only, curve speed capped
- Preview replays the real mission file, incl. time / battery estimates
- Fix: photo counts on split missions
Note: this is the last update for a while. Development of new features, the execution platform and flight-hardware integration is paused for now.
Earlier updates
2026-10-05 18:45 UTC: continuous capture in bright light with auto-fix; high-velocity flight fixes; smoother video paths and gimbal velocity limits; improved polygon drawing and editing; improved flight-path preview incl. video and POI paths in the tilted 3D map; drone specs aligned with all calculations; various waypoint mission and keyframing upgrades and fixes for smoother, more reliable execution.
2026-10-04 00:56 UTC: fixed a bug in the video flight-path preview and the POI preview in 3D (tilted map).
2026-10-04 00:34 UTC: fixed multiple high-velocity flight issues in the planner; fixed video smoothing and gimbal velocity limits; new optional continuous capture mode in bright light, with auto-fix options; improved polygon drawing and editing and the flight-path preview; aligned the individual drones’ technical specs with the calculations.
2026-10-03 15:38 UTC: fixed the MTP waypoint upload to the DJI RC 2 – now fully functional.
2026-10-03 13:07 UTC: fixed a bug in the compact view that prevented UI interactions.
🔐 Verify your download SHA-256
0eadf8722ebf1c08be2290940b65d9e971b23af01fbfd1f67684402de5cd2419bc6d577dc6a93ef0387ec7fa9513d4846cf3e4aec534c708c8bbb82e13751a83Compare the hash of your downloaded file with the value above. In Windows PowerShell: Get-FileHash .\JK4U-Mavic-Mapper.zip -Algorithm SHA256 – or in Command Prompt: certutil -hashfile JK4U-Mavic-Mapper.zip SHA256. If the values differ, do not run the file and download it again from this page. The .exe inside the .zip is the same program; its hash is the one listed for the .exe.
Download the .zip (or the single .exe) – no installer, no wizard. Unpack the .zip.
Double-click the .exe. The planner opens in your browser.
Draw, calculate, export the KMZ and fly.
Windows may show a SmartScreen notice for unsigned programs – choose “More info → Run anyway” if you trust the source. Provided as is: no warranty, no service, and no responsibility accepted under any circumstances for the use of this software. You are solely responsible for every flight – keep the aircraft in visual line of sight, obey local aviation rules and test new missions slowly. Full disclaimers